Table of Contents Show
Are you looking to harness the power of the sun and upgrade your RV with solar panels? Installing solar panels on an RV rubber roof is a great way to take advantage of renewable energy while on the road. In this step-by-step guide, we will walk you through the process of installing solar panels on your RV rubber roof, ensuring a successful and efficient installation.
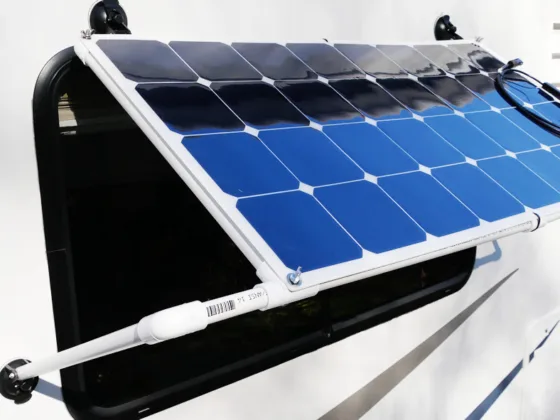
How to Install Solar Panels on an RV Rubber Roof
Step 1: Gather the Necessary Materials
Before you begin the installation process, it’s important to gather all the necessary materials. You will need:
- Solar panels
- Mounting brackets
- Sealant
- Wiring and connectors
- Tools (drill, screwdriver, etc.)
Step 2: Determine Panel Placement
Decide where you want to install the solar panels on your RV rubber roof. Consider factors such as optimal sunlight exposure and available space. It’s advisable to place the panels in an area with minimal shade and obstructions to maximize their efficiency.
Step 3: Prepare the Roof
Clean the RV rubber roof thoroughly to ensure proper adhesion of the mounting brackets. Remove any dirt, debris, or old sealant. Use a mild detergent and a soft brush to scrub the surface gently. Rinse the roof with water and let it dry completely before proceeding.
Step 4: Install the Mounting Brackets
Using the appropriate screws or adhesive, install the mounting brackets on the designated areas of the RV rubber roof. Ensure that they are securely attached and properly aligned.
Step 5: Attach the Solar Panels
Place the solar panels on the mounting brackets and secure them using the provided hardware. Double-check that they are tightly fastened and positioned correctly.
Step 6: Seal the Edges
Apply a generous amount of sealant around the edges of the solar panels and the mounting brackets to create a watertight seal. Use a sealant specifically designed for RV roofs to ensure durability and protection against leaks.
Step 7: Connect the Wiring
Connect the wiring from the solar panels to your RV’s electrical system. Follow the manufacturer’s instructions carefully and make sure all connections are secure. It’s recommended to seek professional assistance if you are not familiar with electrical work.
Step 8: Test the System
Once the installation is complete, test the solar panel system to ensure everything is functioning correctly. Monitor the power output and check for any signs of malfunction or irregularities.
Also Read:
Conclusion
Installing solar panels on an RV rubber roof can significantly enhance your RVing experience. Not only will you have access to clean and renewable energy, but you will also reduce your reliance on traditional power sources.
By following this step-by-step guide, you can confidently install solar panels on your RV rubber roof and enjoy the benefits of sustainable energy wherever your travels take you.